

How To Put Background Image In Rhino
How to employ PictureFrames equally a Groundwork Reference Image
PictureFrames can be used to brand a more than flexible and powerful version of Rhinoceros's BackgroundBitmap. Images are attached as texture maps to planes in 3D space and displayed in rendered mode. The texture map shows up, rather than being placed in the background of the viewport, independent of geometry.
Some advantages to using PictureFrames:
-
An unlimited number of images tin exist placed in the scene. View these in any and all viewports.
-
Images can be scaled and rotated every bit needed, unlike BackgroundBitmap which aligns only with the cplane X and Y.
-
Images can be dimmed and made more or less transparent.
A possible disadvantage is that there is no guarantee that the prototype volition always exist behind everything in space. PictureFrames are but objects in 3D infinite.
To use PictureFrames as a background reference image
Start the PictureFrame control (Surface toolbar>Planes flyout>PictureFrame, or blazon PictureFrame and Enter.) You lot will run across the File Open up dialog as Rhino sends y'all off to locate the image you lot wish to use. Once you select the image, y'all are prompted to identify the plane as in the Plane 3Point control, with a Vertical choice. Note that the plane can be any size just is constrained to being of the same aspect ratio as the image. The first bespeak picked for the plane corresponds to the lower left corner of the image, the second to the lower right, and the third pick places the top edge.
The plane is automatically assigned the image as a texture map, the epitome being mapped to the surface UV. You lot can see this texture assignment in the plane's object Backdrop >Fabric page. The plane has a Basic textile assigned and the epitome is in the texture channel.
Since this is a material channel, it is simply displayed in the viewport when in Rendered viewport mode or, in V4, some other brandish style that shows material (Options>Advent>Advanced Settings. The setting to show object materials is on the elevation level page of the style nether Shading settings> Color and fabric usage.) The rendered mode is set up this way by default, but it is possible to make new modes that take this set up every bit well. These modes must exist prepare in the viewports or use the SetObjectDisplayMode command to set per object display modes. This 2nd method may be more useful since information technology allows the airplane to be displayed with the image no matter how the viewport display is set up. Note that the object display mode is set up in the current viewport when the command is run. You must employ the command again to see textures in any other viewport.
.
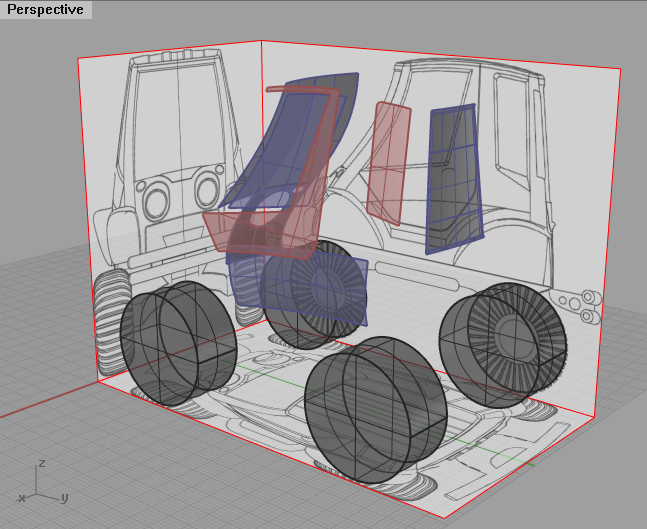
Three PictureFrame planes set upwards to brandish reference images.
.
Once set up, the planes can be adjusted similar any other object in Rhino with transform commands to marshal and rotate them as needed. The Orient command tin be used to scale and align points on the image to known dimensions and locations. Adjust image intensity in the Backdrop> Material folio. Transparency and image intensity would be the almost useful to adjust. These can be adjusted to preset levels using the Material Texture and Fabric Transparency toolbars.
.
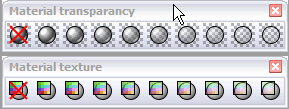
Material preset toolbars.
.
It may be useful to place picture frames on separate layers so they can be selected, locked, or hidden easily. It may likewise be useful to ready upwardly a special brandish mode in v4 with settings that are tweaked more than than you would typically want them to exist in a standard render mode. For example, turning off backfaces allows images to exist placed on all sides of an object without obscuring the view.
Beneath is a control macro that can be added to a push button or command alias to automate the process of applying the image and brandish modes to the planes in V4. Substitute any number betwixt 0 and 100 for the 90 in the example to change the transparency of the planes.
! //PictureFrame //Suspension //Intermission //Pause _SelLast //-Properties //Material //Object //Enter _Transparency 90 //Enter //Object //ShowIsocurves //No //Enter //Enter //SetObjectDisplayMode //Mode=Rendered

How To Put Background Image In Rhino,
Source: https://wiki.mcneel.com/rhino/pictureframes
Posted by: kleinrepasustem1946.blogspot.com
0 Response to "How To Put Background Image In Rhino"
Post a Comment